You can now get your screenshots uploaded directly to your cloud storage through Apps as easily as you get your web captures in your inbox. Once an App is defined, it can be used in one or many captures. Currently, we support uploading to your AWS S3 bucket, Azure Blob storage, and FTP server. We will add more Apps shortly.
You can upload your screenshots in multiple names with custom folder and file names.
Getting started with Apps easy:
- Create a new App
- Add the App to your existing captures
Create a new App
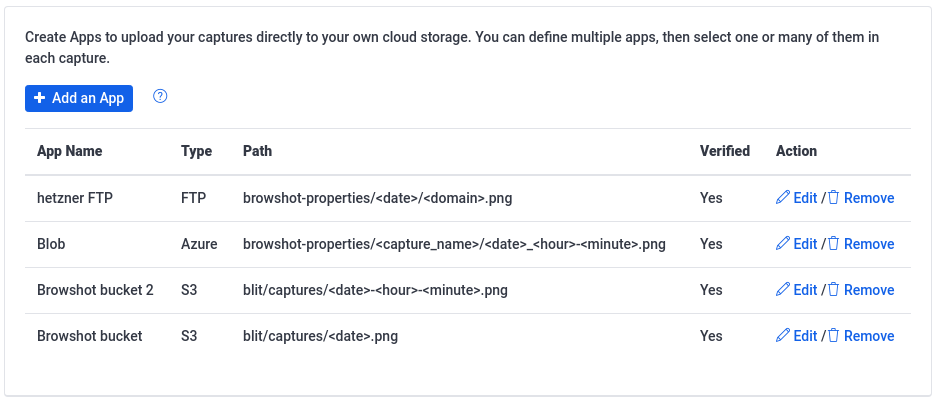
The left menu has a new entry for Apps. There, you will see all the Apps that you create. Click on Add an App.
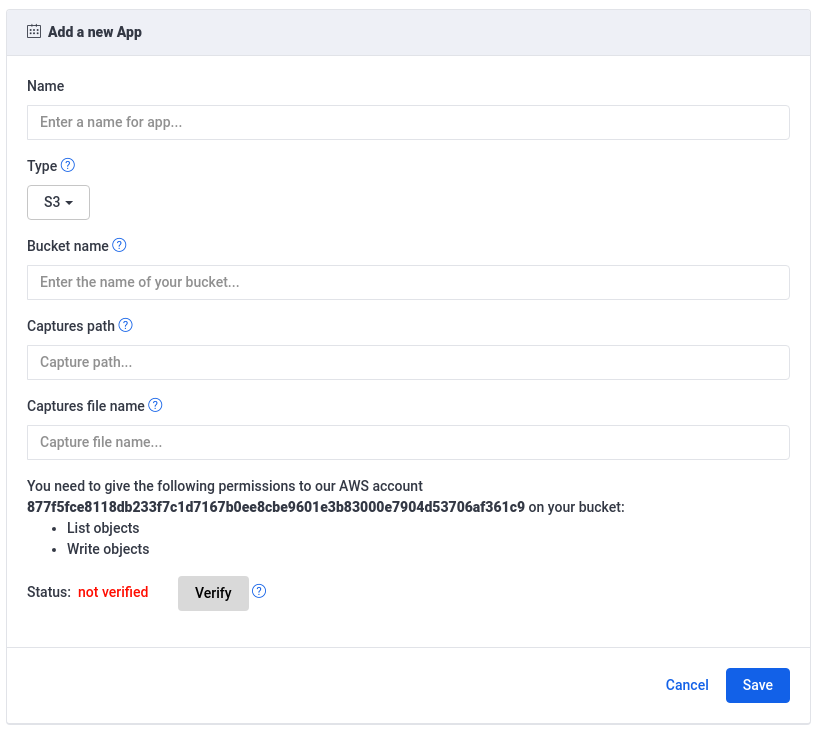
Enter a name for your App and one of the types supported. Then configure your App to allow Blit to upload your captures. We have instructions to configure each App when you click on “Support” (right side) and on this blog:
- Amazon S3
- Azure Blob
- Dropbox
- Google Drive
- Microsoft OneDrive
- FTP, SFTP
- RSS feed
- Webhook
- Slack
- and more
You can enter the custom folder and file names that will be used for each image. We support several variables to create dynamic paths:
Time variables
<year>: 4-digit year, e.g. 2019
<month>: 2-digit month, e.g. 02
<day>: 2-digit day of the month, e.g. 09
<hour>: 2-digit hour of the day, 24-hour format, e.g 15
<minute>: 2-digit minute, e.g. 01
<date>: same as <year>-<month>-<day>, e.g. 2019-02-09
Capture variables
<capture_name>: the name of the capture. The name will be normalized, so “My Capture” will become My_Capture.
<browser>: the browser used, e.g. Chrome
<country>: the country selected, e.g. USA
<height>: the browser height, e.g. 1024
<width>: the browser width, e.g. 1280
<size>: the size of the screenshot, e.g., Full_Page or Screen
<domain>: the link hostname, e.g. www.google.com
<url>: the full link. After normalization, https://www.google.com/?q=test&gl=USA would become https_www.google.com\_q\_test\_gl\_USA
Other variables
<random>: a random string in a form of a UUID, e.g. 936cbd00-ea49-11e9-8c5f-a901c1b99c6b
<count>: for a group of URLs, the index of the URL, e.g., 0, 1, 2, … if the capture has only one URL, it will always be 0.
Examples
Here are some examples of path and file names for different types of captures.
mysite.com/<date>.png
For a daily capture of the website Browshot.com, you could save all the captures in the same path browshot.com and use <date>.png as the file name.
- Captures path: browshot.com
- Captures file name: <date>.png
The captures will be uploaded as browshot.com/2019-10-18.png, browshot.com/2019-10-19.png, etc.
<date>/<capture_name>/<domain>.png
For a daily capture of 3 websites (mysite.com, mysite.net, and mysite.org), use the domain name of each URL as the file name and the data and name of the capture for the folder.
- Captures path: <date>/<capture_name>
- Captures file name: <domain>.png
- Used with capture name “My Capture”
The captures will be uploaded as 2019-10-18/my_capture/mysite.com.png, 2019-10-18/my_capture/mysite.net.png, 2019-10-18/my_capture/mysite.org.png.
Once the App is configured, you can verify that it works well by clicking on Verify. Blit will upload an empty file and will report any error.
Use the App
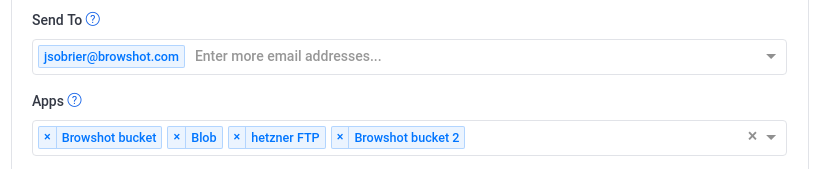
Your App will now show in the list of Apps. When you edit an existing capture or schedule a new capture, there is a new field for Apps. Click in the box to see the list of Apps available, or start typing its name to filter the list.
That’s it! Now your captures will be uploaded to your cloud automatically. If there is any issue during the upload, we will send you an e-mail.